

Baked Denver Omelet: An Effortless & Delicious Breakfast Quiche
Dive into the world of simple yet sophisticated breakfast fare with our extraordinary Baked Denver Omelet. This innovative recipe transforms the much-loved classic Denver omelet into a convenient, crustless quiche, making it an ideal choice for both busy week mornings and leisurely weekend brunches. It combines all the traditional flavors you adore – savory diced ham, vibrant red and green bell peppers, and a generous layer of melted cheese – with a contemporary and zesty kick from fresh jalapeño. The best part? You don’t need any complex omelet-making techniques or special equipment to create a perfectly golden, fluffy, and utterly delicious meal.

For many, a Denver omelet—also known as a Western Omelet—is a cherished breakfast or brunch staple, especially when accompanied by a side of spicy salsa. In times when dining out might not be an option, recreating these beloved flavors at home becomes a true delight. This baked version captures the essence of a traditional omelet, delivering a hearty and satisfying experience that rivals your favorite diner’s offering, all from the comfort of your kitchen.
This dish is more than just a recipe; it’s a taste of comfort and cherished memories. Inspired by the vibrant atmosphere of the Denver area and the joy of sharing meals with loved ones, this Spicy Baked Denver Omelet was crafted to bring that warmth and deliciousness right to your table. It’s a versatile dish that provides a substantial start to your day and is perfect for any occasion, ensuring you never have to pine away for your favorite breakfast.
Unpacking the History: What is a Denver or Western Omelet?
The Denver omelet, frequently referred to as a Western omelet, holds a significant place in American culinary lore, with its origins steeped in the pragmatic needs of early settlers and workers. While the precise genesis remains a topic of spirited debate, two prominent theories offer compelling insights. One suggests its birth among the resourceful cattle drivers of the American West. These hardworking individuals required substantial, portable meals to sustain them during long days on the trail, and an egg and meat creation tucked into bread would have been perfectly suited to their mobile lifestyle.
Another fascinating theory credits Chinese railroad cooks, who may have adapted their traditional egg foo yong into a more accessible, sandwich-like format. This adaptation would have provided a familiar yet novel dish, appealing to a broader palate and serving as a convenient, energy-rich meal for the railroad construction crews. Regardless of its exact lineage, the Denver omelet quickly cemented its status as a breakfast classic, celebrated for its robust flavors and satisfying components.
The hallmark of a true Denver omelet has always been its distinctive blend of ingredients: tender diced ham, crisp bell peppers (traditionally green, but often complemented by red for color and sweetness), and finely chopped onions, all sautéed to perfection. These core elements create a harmonious balance of savory, sweet, and subtly piquant notes. Over time, the addition of shredded cheese—most commonly cheddar or Monterey Jack—became a popular enhancement, contributing a creamy richness that beautifully binds the ingredients and adds another layer of indulgence to this iconic breakfast dish.
The Brilliance of Baking: Why a Baked Omelet Reigns Supreme
While the classic pan-fried omelet is a skill many aspire to master, the baked, quiche-style Denver omelet offers compelling advantages that make it a superior choice, particularly for home cooks and those looking to simplify their morning routine. The primary benefit lies in its unparalleled convenience. Baking completely eliminates the need for tricky individual omelet flipping, a task that can be intimidating for novices or cumbersome when cooking for a crowd. Instead, you simply assemble your ingredients in a baking dish and let the oven perform its magic, freeing you to focus on other aspects of your meal preparation or simply enjoy a more relaxed start to your day.
Moreover, the baking method ensures exceptional consistency. Every slice emerges uniformly cooked, with a perfectly set custard texture throughout, avoiding the common pitfalls of overcooked edges or runny centers that can plague pan-fried versions. This approach also boasts remarkable scalability; effortlessly adjust the recipe to fit a smaller round dish for an intimate gathering or a larger rectangular pan when entertaining a big group. Furthermore, the inherent crustless nature of this baked omelet naturally aligns with gluten-free and lower-carbohydrate diets, making it an excellent option for those following specific eating plans, including keto. It truly is a versatile, no-fuss method to enjoy a beloved breakfast classic without compromising on flavor or quality.
Essential Ingredients for Your Perfect Baked Denver Omelet
Creating an outstanding Baked Denver Omelet begins with a thoughtful selection of fresh and flavorful ingredients. Each component contributes to the rich taste and satisfying texture that makes this dish a true breakfast highlight.
- Cooking Spray or Butter/Oil: Crucial for ensuring a non-stick surface and infusing the dish with an initial layer of flavor. While butter offers a classic richness, olive oil is a healthy and equally effective alternative.
- Onion: Opt for yellow or white onions, as their mild sweetness becomes wonderfully pronounced when sautéed, forming a foundational aromatic base for the omelet.
- Red and Green Bell Peppers: These provide the iconic Denver omelet flavor, offering a beautiful burst of color and a subtle, sweet crunch. Uniformly chopping them ensures even cooking and distribution throughout the dish.
- Jalapeño Pepper: This is our exciting modern twist! The jalapeño introduces a delightful hint of heat and a distinctive, fresh flavor. For a milder spice, remember to remove the seeds and white membranes; for a bolder kick, leave some in.
- Salt and Black Pepper: Simple yet essential, these seasonings elevate and balance the flavors of all the other ingredients. Adjust their quantity according to your personal taste preferences.
- Diced Cooked Ham: The quintessential protein of the Denver omelet. Using pre-cooked ham significantly cuts down on preparation time. Leftover holiday ham is an excellent choice, or you can easily find pre-diced ham at your local grocery store.
- Monterey Jack and Cheddar Cheese: A superb combination! Monterey Jack cheese melts wonderfully, contributing a creamy, smooth texture, while Cheddar offers a familiar, savory tang. For the best melt and flavor, freshly shred your cheese instead of using pre-shredded varieties.
- Eggs: The fundamental base of any magnificent omelet or quiche. Standard large eggs are perfect. Ensure they are thoroughly beaten to achieve an airy, consistent custard base for your baked creation.
- Milk or Half-and-Half: This liquid component adds vital richness and helps create the luxuriously smooth, custardy texture that defines a great baked omelet. Using half-and-half will result in an even creamier and more decadent dish.
Step-by-Step Perfection: Crafting Your Easy Baked Denver Omelet
Creating this Baked Denver Omelet is straightforward and rewarding. Follow these detailed instructions, complete with helpful tips, to ensure a flawless and delicious outcome every time.
- To begin, preheat your oven to 350 degrees Fahrenheit (175 degrees Celsius). This crucial first step ensures the oven reaches and maintains the ideal temperature for even cooking and a beautifully set omelet. Next, lightly spray a 10-inch round baking dish (or a similar-sized rectangular dish) with cooking spray, making sure to coat all inner surfaces thoroughly to prevent sticking and facilitate easy serving. Once prepared, set the dish aside.
- In a spacious skillet or sauté pan, melt two tablespoons of butter over medium heat. Once the butter is shimmering and melted, add the precisely chopped onion, red bell pepper, and green bell pepper. Sauté these vibrant vegetables for approximately 3 to 4 minutes, stirring frequently, until they begin to soften. The goal here is to achieve tenderness and bring out their natural sweetness without allowing them to brown.
- Introduce the finely chopped jalapeño pepper to the pan and continue to cook for just 30 seconds more. This brief cooking period is sufficient to mellow its raw heat slightly and seamlessly integrate its distinct, fresh flavor with the other aromatic vegetables.
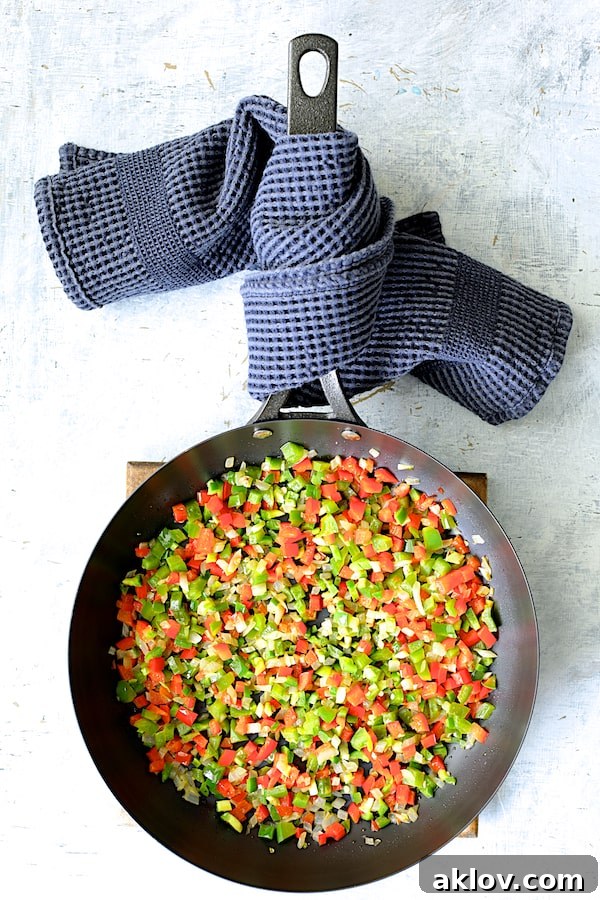
- Season the sautéed vegetables generously with half a teaspoon of salt and a liberal grinding of fresh black pepper, adjusting to your personal taste. Once seasoned, carefully transfer the entire mixture from the skillet into your previously prepared baking dish. Spread the vegetables out evenly across the bottom of the dish and allow them a few moments to cool slightly. This brief cooling period is important as it prevents the eggs from cooking prematurely or scrambling when they are added later.
- Next, take the diced cooked ham and sprinkle it uniformly over the layer of vegetables in the baking dish. Ensuring an even distribution guarantees that every mouthwatering bite of your omelet will include a delightful piece of savory ham.
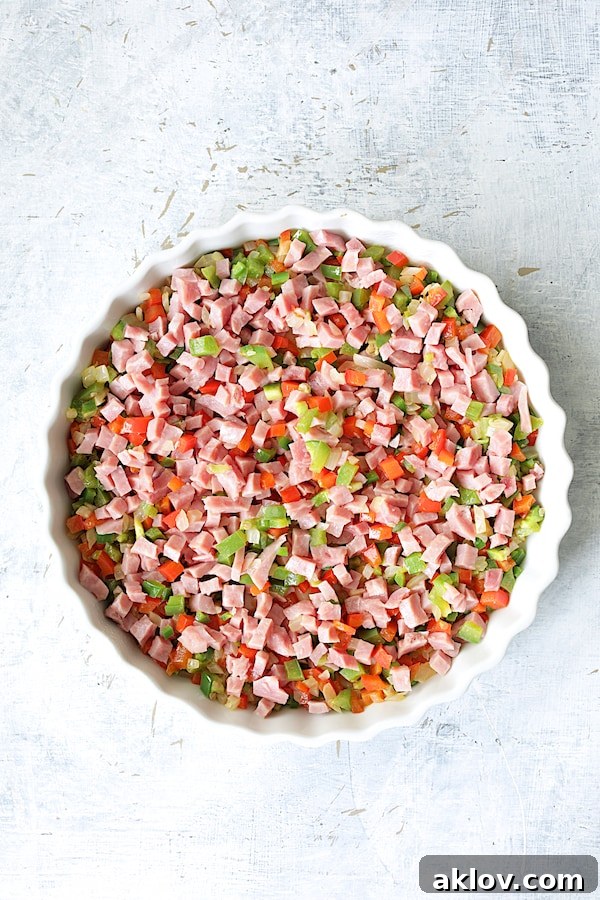
- Now, evenly scatter the shredded Cheddar cheese and Monterey Jack cheese over the ham and vegetable layers. The harmonious blend of these two cheeses ensures both a fantastic melt and a rich, complex flavor profile throughout the omelet.

- In a separate, medium-sized bowl, whisk together the six large eggs with half a cup of milk (or half-and-half if you prefer a richer result). Whisk vigorously until the mixture is thoroughly combined and appears slightly frothy; this aeration contributes to a lighter, airier custard. Carefully pour this prepared egg mixture over the entire combination of vegetables, ham, and cheese in your baking dish, ensuring it blankets all the solid ingredients evenly.

- Place the baking dish into the preheated oven and bake for approximately 30 to 40 minutes. The omelet is fully cooked when its center is set and the top has achieved a beautiful, light golden-brown hue. To double-check for doneness, a thin knife or skewer inserted into the very center should come out clean.
- Once baked to perfection, carefully remove the omelet from the oven and allow it to rest for a few minutes before slicing. This resting period is crucial as it permits the omelet to set further and makes for cleaner cuts. Finally, slice your masterpiece into 6 to 8 generous wedges and serve warm to eager diners.


And there you have it – a breakfast classic, meticulously transformed into an incredibly easy and incredibly flavorful baked version, all beautifully finished with a delightful jalapeño kick! There’s no longer any need for specialized flipping techniques or tricky maneuvers. This recipe consistently delivers all the hearty, savory goodness of a traditional Denver omelet without any of the fuss, making it an accessible and impressive dish for any home chef, regardless of experience level.
As an added benefit, because this is a crustless dish, our Spicy Baked Denver Omelet stands out as an excellent and highly adaptable choice for individuals adhering to specific dietary requirements. It is naturally gluten-free, boasts a low-carb profile, and can be effortlessly integrated into keto diets, offering a delicious, wholesome, and guilt-free meal that truly everyone can enjoy. We encourage you to savor the experience of both creating and indulging in this fantastic, versatile breakfast or brunch staple!

Elevate Your Dish: Customization & Serving Suggestions for Your Baked Omelet
One of the most appealing aspects of this Baked Denver Omelet is its incredible adaptability, allowing you to easily customize it to your personal taste or whatever fresh ingredients you might have on hand. Don’t hesitate to experiment! For a different textural and flavor dimension, consider incorporating other sautéed vegetables such as earthy mushrooms, tender fresh spinach, or the concentrated flavor of sun-dried tomatoes. The cheese selection is also flexible – Swiss, Gruyere, provolone, or even a spicy pepper jack would meld wonderfully with the existing flavors, offering a new twist with each choice. If ham isn’t your preferred protein, crispy crumbled bacon, savory breakfast sausage, or even smoked turkey can serve as excellent substitutes, each adding its unique character to the dish. For those who crave more heat, a small pinch of red pepper flakes stirred into the egg mixture or a generous dash of your favorite hot sauce drizzled over individual servings will certainly do the trick.
When it comes to serving, this impressive omelet is perfectly capable of being the star of the show on its own. However, it also pairs beautifully with a diverse array of complementary sides, making it ideal for a comprehensive breakfast or brunch spread. A crisp, light green salad dressed with a simple vinaigrette provides a refreshing counterpoint, particularly when serving for brunch. For a more substantial meal, consider accompanying it with perfectly roasted potatoes, a basket of warm, crusty bread, or a vibrant fresh fruit salad to add a touch of sweetness and lightness. And don’t forget the condiments! A dollop of tangy sour cream, a spoonful of your favorite spicy salsa, or a delicate sprinkle of fresh chopped chives or cilantro can introduce an extra layer of freshness and flavor to each and every bite. For the ultimate brunch experience, a steaming cup of freshly brewed coffee or a sparkling mimosa would complete the perfect tableau.
Smart Prep: Make-Ahead Tips & Storing Leftovers
This Baked Denver Omelet isn’t just delicious; its convenience makes it an outstanding option for meal preparation and streamlining those hectic morning routines. Should you find yourself with any of this delightful creation remaining, proper storage is key to preserving its taste and texture for future enjoyment.
Refrigerator Storage: To maintain freshness, allow the baked omelet to cool completely to room temperature. Once cooled, either cover the entire baking dish tightly with plastic wrap or transfer individual slices into an airtight container. Stored correctly, your omelet will remain delicious in the refrigerator for up to 3-4 days. For maximum convenience, cutting the omelet into single-serving wedges before refrigerating makes it incredibly easy to grab and reheat as needed.
Reheating Instructions: While microwaving individual slices offers a quick reheating solution, for the absolute best texture and flavor, we highly recommend using your oven. Place the desired number of slices on a baking sheet and reheat them in a preheated 350-degree Fahrenheit (175°C) oven for approximately 10-15 minutes, or until they are thoroughly heated through. This method prevents the omelet from becoming rubbery and helps to restore its lovely custardy consistency.
Freezer-Friendly Option: This omelet freezes exceptionally well, making it a fantastic make-ahead option! Once the omelet has completely cooled, wrap individual wedges securely in plastic wrap, ensuring no air exposure. Then, place these wrapped portions into an airtight, freezer-safe container or a heavy-duty freezer bag. The omelet can be safely stored in the freezer for up to 1-2 months. When you’re ready to enjoy it, simply transfer a frozen portion to the refrigerator to thaw overnight. Once thawed, reheat it in the oven using the instructions provided above. Freezing in individual portions is a game-changer for convenient, ready-to-eat breakfasts whenever hunger strikes.

Explore More Delicious Breakfast & Brunch Recipes
If you’ve enjoyed the hearty goodness of our Baked Denver Omelet and are looking for more satisfying breakfast and brunch ideas, you’ve come to the right place! We’ve curated a collection of our favorite recipes that are perfect for entertaining guests or simply indulging in a delightful morning meal:
- Hash Brown Frittatas with Kale, Bacon and Cheddar
- Breakfast Strata with Asparagus, Artichokes, Ham and Gruyere
- Muffin Pan Stratas with Basil and Sun-Dried Tomatoes
- Four-Cheese Strata with Zucchini and Tomatoes
- Artichoke Spinach Quiche
- Crustless Quiche with Sausage, Bacon and Ham
- Oven-Baked Spanish Tortilla

Baked Denver Omelet Recipe
By Carol | From A Chef’s Kitchen
This Baked Denver Omelet is an incredibly easy, crustless quiche version of the classic. It features flavorful red and green bell peppers, savory ham, and plenty of rich cheese. Diced jalapeño provides a modern, kicked-up twist, and you’ll love that no fancy omelet-making skills are required!
Recipe Details
- Prep Time: 15 minutes
- Cook Time: 40 minutes
- Total Time: 55 minutes
- Servings: 6-8
Equipment
- Wusthof Chef Knife
- Cutting Board
- Nonstick Skillet
- Round Baking Dish
Ingredients
- Cooking spray
- 2 tablespoons butter
- 1/2 medium onion, chopped (approximately 1/2 cup)
- 1/2 large red bell pepper, chopped (approximately 2/3 cup)
- 1/2 medium green bell pepper, chopped (approximately 1/3 cup)
- 1 large jalapeño pepper, seeded if desired, chopped
- 1/2 teaspoon salt
- Freshly ground black pepper, to taste
- 8 ounces diced cooked ham, approximately 1 cup
- 3/4 cup shredded Monterey Jack cheese
- 3/4 cup shredded Cheddar cheese, sharp, medium or mild
- 6 large eggs, beaten
- 1/2 cup milk, or half-and-half
Instructions
- Preheat oven to 350 degrees Fahrenheit (175°C). Spray a 10-inch round baking dish with cooking spray. Set aside.
- Heat butter over medium heat in a skillet or sauté pan. Add the onion, red and green bell pepper and cook 3-4 minutes just to soften.
- Add the jalapeño and cook for 30 seconds.
- Season vegetables with salt and black pepper. Transfer to the prepared baking dish and let cool slightly.
- Add the diced ham and cheeses and stir to distribute evenly.
- Whisk eggs and milk (or half-and-half) together. Pour over the vegetable-ham-cheese combination.
- Bake for 30-40 minutes or until set and lightly browned on top.
- Cut into 6 to 8 wedges and serve.
Notes
- SUBSTITUTION: For an extra kick of heat, consider replacing some of the bell peppers with diced Poblano peppers.
- REHEATING INSTRUCTIONS: If desired, cut into wedges for easier reheating. Place slices on a baking sheet and reheat in a 350-degree Fahrenheit (175°C) oven until thoroughly heated through.
- FREEZER-FRIENDLY: To freeze, wrap individual portions securely in plastic wrap, then place in an airtight, freezer-safe container or bag. Freeze for 1-2 months. Thaw overnight in the refrigerator before reheating in a 350-degree Fahrenheit (175°C) oven until warm.
Nutrition Facts (per serving)
- Serving: 1
- Calories: 292 kcal
- Carbohydrates: 5 g
- Protein: 23 g
- Fat: 20 g
- Saturated Fat: 10 g
- Polyunsaturated Fat: 8 g
- Cholesterol: 249 mg
- Sodium: 837 mg
- Fiber: 1 g
- Sugar: 2 g
Nutritional values are automatically calculated using unbranded products and are estimates only. Actual results may vary based on ingredients used and portion sizes. Adjust as needed for dietary restrictions, allergies, or health concerns.

Enjoyed this recipe? Leave a comment below and share your thoughts!